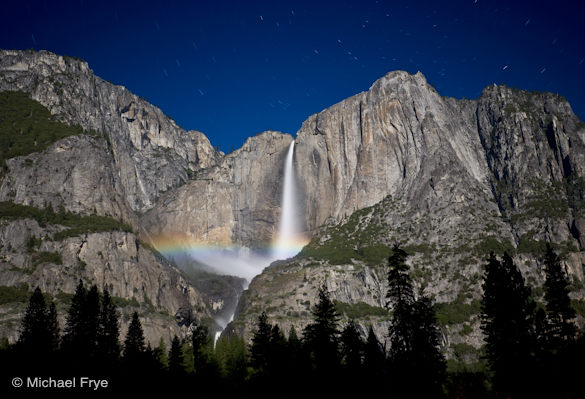
In Friday’s post on my other blog I described some of my experiences attempting to photograph lunar rainbows, but here are some tips for capturing your own moonbow images.
The moon will become full at 5:19 Wednesday morning, so Tuesday night will provide the brightest moonlight, and the best chance to photograph a lunar rainbow this month—if the weather cooperates. Unfortunately the forecast calls for rain. If the predictions are faulty, and some moonlight manages to break through the clouds, cool temperatures will probably limit the amount of spray on Upper Yosemite Fall, so Lower Yosemite Fall may work better. For the upper fall, you might be better off waiting for the next full moon on May 27th. For detailed information on times and places to photograph lunar rainbows in Yosemite, see Don Olson’s site.
For those who aspire to capture lunar rainbows, here are some tips.
Equipment
Any digital SLR will work, but full-frame sensors usually produce less noise and work better for the long exposures required at night. A sturdy tripod is essential, plus a locking cable release or electronic release. You’ll want a good flashlight or headlamp, a watch to time long exposures, and a cloth for wiping spray off the lens if you’re at the lower fall. Long exposures drain batteries quickly, so make sure your camera battery is fully charged—and your spare too.
Focus and Depth of Field
To make exposure times reasonably short, you’ll have to keep your aperture wide open, or close to it. That means you won’t get much depth of field, so try to exclude foregrounds from your compositions. This shallow depth of field makes focusing critical. It’s obviously difficult to focus manually in the dark, and autofocus won’t work either. In the past I’d just manually set the lens at infinity, but many lenses now focus past infinity, making the correct focusing point difficult to determine. The solution is to find something distant that’s bright enough to focus on, like the moon itself, car headlights, or perhaps a bright light that you place far away. Then focus on that bright spot, using either manual or autofocus. The most precise method is probably focusing manually during a zoomed-in look in live view. Once you’ve set the focus, turn autofocus off and don’t touch the focusing ring—leave the lens set at this distance for all your images. You might even tape the focusing ring so it doesn’t move.
Exposure
Pushing up the ISO will make your exposure times shorter, but you’ll get less noise with longer exposures at lower ISOs. You’ll get the least noise with your camera’s native ISO (100 for most cameras, 200 for some older Nikons). Since light meters don’t work under such low light levels, here are some recommended exposure times for a scene lit by a full or nearly-full moon. You’ll have to set the camera on Bulb and use a locking cable release.
ISO 100: 3 minutes at f/2.8; 6 minutes at f/4
ISO 200: 90 seconds at f/2.8; 3 minutes at f/4; 6 minutes at f/5.6
ISO 400: 45 seconds at f/2.8; 90 seconds at f/4; 3 minutes at f/5.6; 6 minutes at f/8
I don’t recommend exposures longer than six minutes, as the rainbow will move while the shutter is open and the bands of color will blur together. On the other hand, if you want pinpoint stars in the sky, rather than star streaks or trails, you’ll have to use shorter exposures and push the ISO up even higher. You’ll want to keep the exposures down to 30 seconds or less with a wide-angle lens, and 15 seconds or less with a normal or telephoto lens. With a wide-angle, try 20 seconds at f/4 and 1600 ISO. The photograph will be noisy, but with most newer full-frame cameras the noise won’t be too objectionable.
One other consideration is that most lenses are not very sharp at their widest aperture. So if your maximum aperture is f/2.8, I’d recommend stopping down to f/4; if your maximum aperture is f/4 I’d recommend stopping down to f/5.6—if you can do so without making the exposure too long, or pushing the ISO too high. There are always tradeoffs in photography.
Many digital SLRs have a “long exposure noise reduction” option buried somewhere in their menus. With this on, after finishing a long exposure the camera will take another exposure of the same length with the shutter closed—a black image—then compare the two captures and try to subtract the noise out of the first one. Since it’s actually making two exposures, it takes twice as long to capture one frame. On many cameras this has little visible effect, so you may as well leave it off. But the only way to know is to test your camera with this option turned on and off, and compare the results. I’d at least recommend keeping it off initially, while you test exposure times, then you might turn it on once you have everything set.
It’s important to note that long-exposure noise reduction does not affect random noise – the grainy pattern you see at high ISOs. Long-exposure noise reduction only affects “hot pixels,” which are the bright white, red, green, or blue pixels that you often find of you leave the shutter open for awhile. These hot pixels tend to increase with longer exposures, higher ISOs, and higher ambient temperatures.
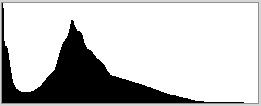
When judging exposures, don’t rely on the appearance of your camera’s LCD screen. At night even a severely underexposed photograph will look much brighter on screen than the surroundings, fooling you into thinking that you’ve made correct exposure when it’s actually way off. Use the histogram! For most moonlight photographs, the histogram should be pushed as far to the right as possible without touching the right edge—that is, the image should be as light as you can make without overexposing anything. This will give you the most noise-free capture. You can, and probably should, darken the image later in software to create more of a nighttime feeling.
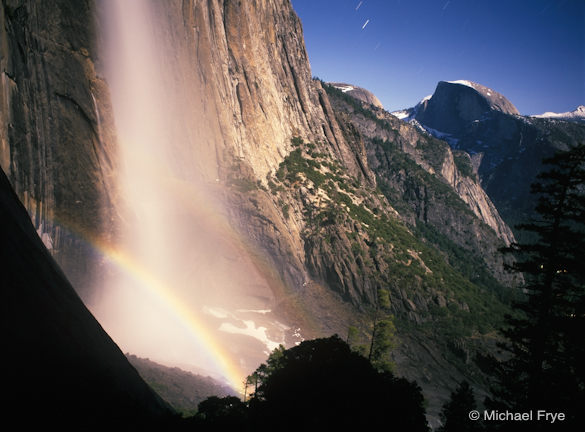
Here’s the unprocessed Raw file of a photograph that I made last year. It looks too light for a nighttime image, but it’s noise-free.
Here’s its histogram. Note that the brightest pixels are near, but not touching, the right edge—ideal for most nighttime captures.
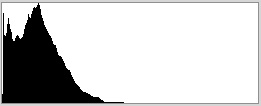
If the histogram is pushed over to the left, like this, the photograph is too dark. Make a longer exposure.
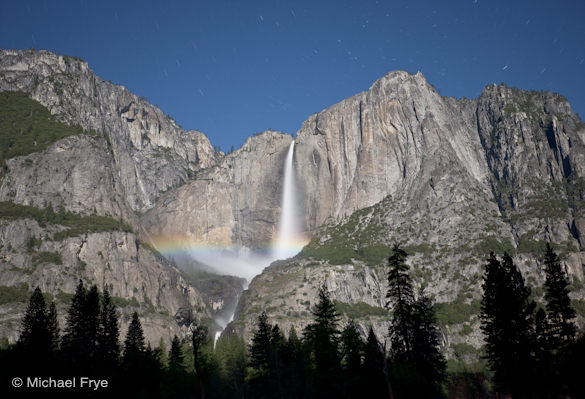
Here’s the final processed image. I darkened it overall, then lowered the sky values even further, to make it look more like a night scene.



Michael, I recently returned from Yosemite, and along with some great dogwood shots, I attempted some full moon star trail shots. Do you have a tutorial online somewhere that speaks about this process? My main struggle was sharpness. I have two great shots, but there are both slightly blurry, more blurry than accecptable. Focusing to infinity did not work for me. Perhaps a blog on star trails sometime? 🙂 Just a suggestion – thank you!
Ben, I don’t have a tutorial specifically about star trails, but the suggestions in this post about focusing apply to any night photos.
You didn’t just get a lunar rainbow. You got a double lunar rainbow!! You’re awesome!!
Here’s the unprocessed Raw file of a photograph that I made last year. It looks too light for a nighttime image, but it’s noise-free
I pulled the above from you notes above. Is the comment you made of the “noise free” shot coming from observations of the histogram or from the picture itself?
Love your subject and love your work!
David M
David, from looking at the image itself, zoomed in. I can’t tell anything about noise from the histogram.
Thanks for the kind words!
Though the federal law requiring court oversight in the particular proceedings helps protect you,
it and delays you from receiving the money as soon as you might
haave hoped. The Annuity is decided depending on the nature of injury, time normally taken to fully recover, type of immobility of the
victim, the status of the victim, etc. Payment streams purchased through Pattriot offger higher rates
of return than otherwise available from banks, treasury bonds or other
fixed income investments.
Also visit my page; Structured Settlement Cash Now Company;Benjamin,
When you take moonbow picture, do you wait the moon light directly on the water fall? What angle is best for moon position? What time did you take the first picture, shown on yosemite trail? Do you have to wait moon position moved to west? Thanks,
John, yes, the moon has to be more-or-less at your back when viewing the waterfall’s spray to see a moonbow. And yes, to see the moonbow from the Upper Yosemite Falls Trail the moon has to be to the west, since you’re looking east. The precise time I took my photo won’t help you, because the moon’s position varies greatly from day to day and month to month. This post explains the basics of how to see a moonbow:
https://www.michaelfrye.com/2016/04/17/mist-trail-night/