Most camera's light meters would read the dark areas in the background and overexpose these dogwood blossoms. To correct for this, you need to either override the meter with exposure compensation, or adjust the exposure manually.
In the first part of this series I explained one of the most fundamental aspects of digital photography: reading histograms. In this edition I’ll delve into the next step: how to adjust the exposure when the histogram doesn’t look right the first time.
Metering Modes
Most digital SLRs have three choices of metering modes: average (or center-weighted average), a “smart” mode (Nikon calls it Matrix Metering, Canon calls is Evaluative Metering), and spot.
The “smart” modes (Evaluative, Matrix, etc.) use software algorithms to evaluate the light and dark components of the photograph and, in theory, solve all exposure problems. Right. Unfortunately, these algorithms seem to work best for photographing people. For landscapes the results are usually the same as with center-weighted average metering—decent, but often wrong.
Spot metering allows you to measure only a small portion of the scene you’re photographing, but this helps only if you know what you’re doing—which means using the Zone System. I delve into the Zone System in my Digital Landscape Photography book, but it’s an advanced technique, and unless you understand it’s complexities I recommend that you avoid spot metering and use either center-weighted average or a “smart” mode (Matrix or Evaluative).
Once you’ve picked a metering mode you then have to decide whether to use manual or automatic exposure. I’ll describe both methods, and let you decide which to use:
Automatic Modes With Exposure Compensation

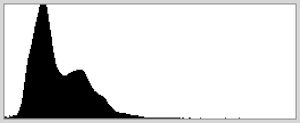
There's a large gap in this histogram between the brightest pixels and the right edge, indicating underexposure. "Plus" exposure compensation will correct this; try +1.0, then add more if this isn't enough.
For automatic exposures I usually recommend using aperture-priority mode. Landscape photography requires paying attention to the aperture, because it’s your main tool for controlling depth of field. But if you’re hand-holding the camera, or photographing a moving subject, you might prefer shutter-priority. Program mode is okay, but you’ll learn to be more aware of your settings if you’re choosing at least one of them yourself—that is, you’re selecting the aperture in aperture-priority mode, or the shutter speed in shutter-priority mode. Avoid the green, “auto-everything” setting that some cameras have. Choosing this won’t allow you to use exposure compensation, which is an essential tool for adjusting automatic exposures.
What’s exposure compensation? It’s simply a way of telling the camera, in automatic-exposure modes like program, aperture-priority, and shutter-priority, that you want to make the image lighter or darker than the meter thinks it should be. If you don’t know how to use the exposure-compensation dial on your camera you’ll have to spend a little quality time with your camera’s manual.

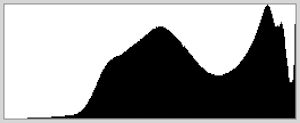
The spike at the right edge of this histogram indicates overexposure. Use "minus" compensation to correct for this; try -1.0, then add more if necessary.
Let’s assume you’re using aperture-priority mode. Pick either center-weighted or one of the “smart” metering modes (Matrix, Evaluative, etc.), then choose the aperture (or f-stop). Use a small aperture like f/16 to get everything in focus, and a large aperture (f/2.8 or f/4) to isolate your subject and throw the background out of focus. The camera will automatically set the shutter speed. Small apertures may result in slow shutter speeds, so use a tripod.
Then take a picture and look at the histogram. In most situations this will look fine. Great—on to the next picture! But if the histogram is shoved too far left or right (see my earlier post on reading histograms), use the exposure-compensation dial. If the first image is overexposed—you see pixels pushed up against the right side of the histogram, or you see the “blinkies”—you’ll have to dial in “minus” compensation. Try -1.0 to start with. If the image looks underexposed—perhaps you see pixels pushed up against the left edge of the histogram, but there’s plenty of room on the right side—you should dial in “plus” compensation. Try +1.0 at first. Keep adjusting the exposure compensation until you get it right.
When you’re done, be sure to set the exposure compensation back to zero!
Manual Exposure

For manual exposures, start by changing the aperture and shutter speed until the meter indicates that you have the correct exposure (as shown here), then adjust from there.
Set your camera to manual mode and use either center-weighted, Matrix, or Evaluative metering. As with aperture-priority automatic, you should usually set the f-stop first to control depth of field. Once again, use a small aperture like f/16 to get everything in focus, a large aperture (f/2.8 or f/4) to isolate your subject and throw the background out of focus.
Next set the shutter speed. Most cameras have a scale indicating over- or underexposure in manual mode. Just rotate the shutter speed dial until the scale shows zero. If the shutter speed ends up being slow, use a tripod.
Then take a picture and look at the histogram. Again, in most cases the histogram will look fine. But if the histogram indicates over- or underexposure, or if you see the “blinkies,” you’ll have to adjust the shutter speed. Don’t change the aperture—you want to keep the same f-stop and depth of field.
If the first image is too light—you see pixels pushed up against the right side of the histogram, or the “blinkies”—use a faster shutter speed. If you started with 1/125, for example, go to 1/250 (a faster shutter speed means less light reaching the sensor, a darker image, and, you hope, a better histogram). If the image looks too dark—perhaps you see pixels touching the left edge of the histogram, but there’s plenty of room on the right side—use a slower shutter speed. If you started with 1/125, go to 1/60. Keep adjusting the shutter speed until you’re satisfied that the histogram looks good and you’ve got the right exposure.
Manual or Automatic?
Both of the approaches I’ve outlined here—aperture priority and manual—are similar. If so, is there any reason to use manual mode? Yes! First, when using aperture priority (or any automatic mode), most cameras only allow exposure compensation up to two stops. Sometimes this is not enough, and the only solution is to switch to manual.
Second, manual settings are essential for stitching together panoramas or expanding depth of field by combining multiple images in software. In both cases it’s vital to maintain consistent exposures between images.
Third, using automatic modes can lead to unnecessary fiddling with the exposure-compensation dial. In automatic modes, the exposure is based on the meter reading, and every time you change the composition, that meter reading changes. A wide-angle view of a scene, for example, might include a lot of dark areas, and require “minus” compensation. A telephoto view of the same scene might include mostly bright spots, and necessitate “plus” compensation. So back and forth you go, constantly moving the exposure-compensation dial.
But if the light hasn’t changed, the exposure shouldn’t either! The same shutter speed and aperture should work regardless of the composition, as long the framing includes the same highlights. In manual mode, once you’ve found the right settings you can just leave them alone, and forget about exposure while you try other compositions. Because of this, I find it quicker and easier to work in manual mode.

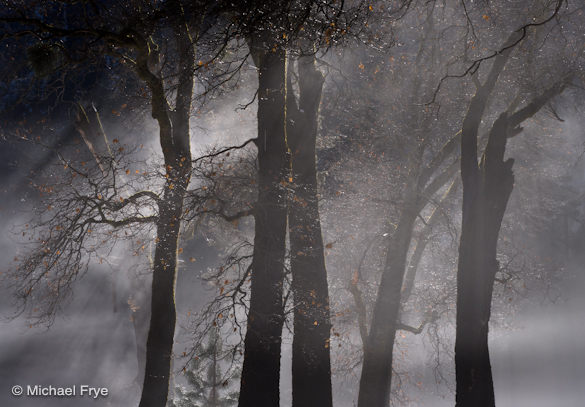
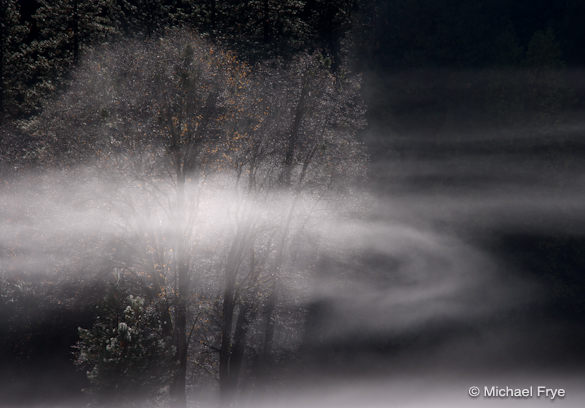
I made these two photographs a few minutes apart. The mist and sun were changing rapidly, but I knew my manual settings (1/20th sec. at f/22, ISO 100) would work for both images, since the light was basically the same. Manual exposure allowed me to work rapidly without constantly adjusting the exposure-compensation dial.
Using Live View
Live View can greatly simplify the process of finding the right exposure—but only if you can see a histogram in this mode. With Nikons, only the higher-end models like the D800, D810, and D850 have a live-view histogram. (While in live view, press the OK button on the back of the camera to enable this feature, then press Info to cycle through different display modes until you see the histogram.) But all the Canon models I’ve seen can, although it might be difficult to figure out how to set this up properly. You need to enable “Exposure Simulation” in the camera menus. In older Canon models this setting is buried about three screens deep in the Live View menus. Once this is set, in Live View mode you may have to press the Info button a couple of times to bring up the histogram.
With this histogram displayed in Live View it’s easy to adjust the exposure before taking the photograph. In automatic modes, just turn the exposure-compensation dial until the histogram is in the right place, with the brightest pixels near, but not touching, the right edge. In manual mode, turn the shutter speed dial until the histogram looks right. You can’t see the blinkies in Live View, so it’s still a good idea to check for these after taking the photo, but otherwise using Live View with a histogram is dead simple.
What About Bracketing?
Many photographers think that bracketing will solve all their exposure problems. But this scattershot method can still completely miss the mark. I’ve found many situations where the camera’s meter indicated an exposure two or three stops lighter than the correct one. So with three bracketed shots, each one stop apart, the darkest image would still be too light. If you bracket, you must still check the histograms and make sure that at least one image is exposed correctly.
I do bracket when photographing high-contrast scenes, so that I can blend these exposures together later in software. But I don’t just bracket one stop lighter and darker than what the meter indicates, and assume I’ve got it. I carefully check my histograms to make sure at least one of these bracketed exposures has good highlight detail, and another good shadow detail. If not, I need to adjust the exposures accordingly.
Your Thoughts
I always welcome your comments and questions. Was this helpful? Which exposure mode do you prefer, and why? And if anything in this post isn’t perfectly clear, ask me about it!


I bought your book on Digital Landscape Photography, last year. A wonderful book …and one of the favorites in my collection!
In September 2010, we returned to the Canadian Rockies , for the seventh time….and I used your techniques on three shots of the Yoho River , in Yoho N. P. , British Columbia :
One of which is on the link, below:
Full manual exposure…….notice the EXIF:
http://www.pbase.com/hootpix/image/129135791
….comments, if you have the time !
Many thanks !
Chuck
Brilliant and easy to understand analysis of this subject, which I am grateful for.
I’ve only just started using histograms and realised that the compensation dial needs to be used in conjunction with the histogram.
You have confirmed that for me, but explained why manual may be bettering some instances.
Thanks Ken – glad you found this helpful!
Chuck, I’m very glad you found the book helpful, and were able to put the ideas to good use in Yoho N.P.!
Love to read your text specially about Digital Landscape Photography
Thank you!
Hello!
I’m having a problem but maybe I’m overlooking something.
In Manual mode, The scale indicating exposures is present but there’s no moving mark on it sometimes.I have a Canon EOS 800D.
Does it only appear at a certain range of shutter speeds or aperture settings?
You probably just need to tap the shutter button lightly to activate the exposure scale.