I’ve always felt that the best photographs capture a mood or feeling. It’s easier to convey a mood when the weather gets stormy, but how do you capture a mood on a clear, sunny day? The answer, I think, is to go with it—to emphasize the sun, the blue sky, and the brightness of the day. Find the visual elements that say “beautiful, sunny day,” and highlight them.
One way of doing this is to include the sun in the frame. Nothing says “sunny and bright” like the sun itself. But putting the sun in your photograph brings challenges. First, you’re likely to get lens flare. This is not the end of the world—in fact, many photographs use lens flare to great effect—but sometimes the flare can be distracting. The other challenge is getting the exposure right.
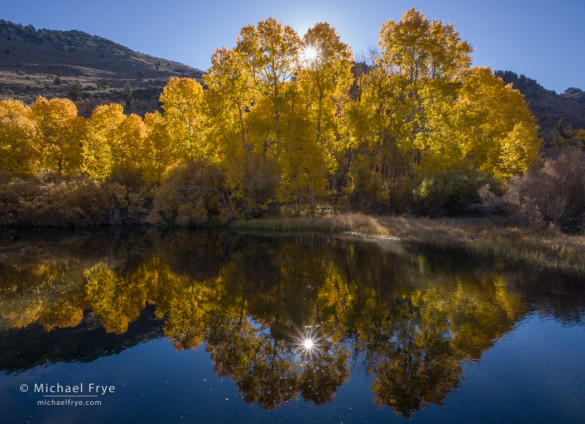
I made this photograph on Wednesday morning, the last day of my second Eastern Sierra Fall Color workshop. It was a beautiful scene, but technically quite challenging to capture. I wanted to show the sun, and get the sunburst effect, but I didn’t want flare. To avoid the flare I had to partially hide the sun behind branches and leaves, but this was doubly difficult because I had to get the position of both the sun and its reflection right. And, of course, the sun was constantly moving.
Handholding makes it easier to move and adapt to the changing sun position, but I wanted to bracket exposures here, in case I needed to blend images later, so that meant using a tripod to keep the framing consistent, and constant slight adjustments of the tripod position to adapt to the motion of the sun. Getting the sunburst effect required a small aperture, so I used f/22, and auto-bracketed three frames, each one stop apart. On many tries I didn’t get the sun in quite the right position, so I missed the sunburst effect in either the sun or its reflection. But on a few occasions I got it right, like in the version shown here.
When the sun is in the frame it can be difficult to judge exposures in the field. It’s normal and natural for the sun itself, and the sky around the sun, to be washed out, which means you should see a small spike at the right edge of the histogram, and some blinkies in and around the sun. In fact if you don’t see any blinkies around the sun the photograph is probably underexposed. On the other hand, you don’t want the whole sky blinking at you. I try to find an exposure that shows some blinkies in and around the sun, and bracket one stop on either side of that. (For more about histograms and blinkies, see this post.)
Since the release of Lightroom 4 and Adobe’s 2012 Process Version, with its phenomenal ability to balance high-contrast scenes in a natural-looking way, I rarely need to blend exposures any more. So even though I bracketed for insurance, I figured that one properly-exposed frame would probably be enough. In fact, processing this photograph in Lightroom was rather easy.
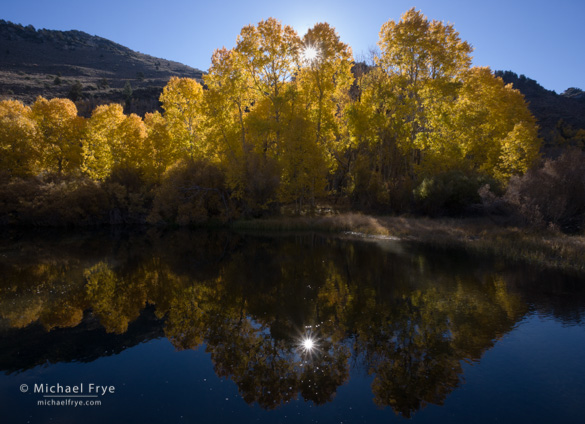
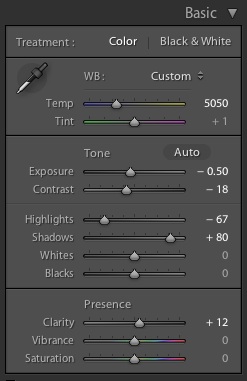
I used the middle exposure in my bracketed sequence, and started by making a compromise Exposure adjustment—something in between the ideal brightness for highlights and shadows. Then I pulled down the Highlights slider, pushed up Shadows, and used the Graduated Filter tool to lighten the water a bit more. I made a few other minor tweaks, but that’s basically it. Here’s what the original Raw file looked like at my default settings, and I’ve also included a screen shot of the Basic Panel settings in Lightroom for the finished image.
If you’re interested in a more in-depth look at these techniques, I demonstrate how to process high-contrast scenes in Lightroom at 21:04 in this free video tutorial. That video is actually the second part of a two-part series, and in the first video I explain how the Basic Panel Tone Controls in Lightroom work. And in my latest ebook, Landscapes in Lightroom 5, I take you step-by-step through processing six different images, including several high-contrast scenes.
So the next time you’re faced with those “boring” blue skies, take what nature gives you, and try to emphasize the feeling of that bright, sunny day. While including the sun can be tricky, it’s worth trying, because it can add greatly to the mood and emotional impact of the image.
— Michael Frye
P.S. By the way, do you know which way the sun was moving in this scene? I’ll give you two hints: it was morning, and I was in the northern hemisphere. That’s all you should need to know to figure out which direction the sun was headed. Knowing how the sun will move is a basic photographic skill, something you need to learn if you want to anticipate how the light will change.
Related Posts: You can see two more examples of sunburst images here and here.
Did you like this article? Click here to subscribe to this blog and get every new post delivered right to your inbox!
Michael Frye is a professional photographer specializing in landscapes and nature. He is the author or principal photographer of The Photographer’s Guide to Yosemite, Yosemite Meditations, Yosemite Meditations for Women, and Digital Landscape Photography: In the Footsteps of Ansel Adams and the Great Masters. He has also written three eBooks: Light & Land: Landscapes in the Digital Darkroom, Exposure for Outdoor Photography, and Landscapes in Lightroom 5: The Essential Step-by-Step Guide. Michael written numerous magazine articles on the art and technique of photography, and his images have been published in over thirty countries around the world. Michael has lived either in or near Yosemite National Park since 1983, currently residing just outside the park in Mariposa, California.


Thanks, Michael. Always nice to hear others’ workflow and challenges with capturing the sunburst in that type of setting. I processed a similar high-contrast exposure tonight and used nearly the same settings before exporting.
Cheers, man.
You’re welcome Jeff, and thanks for your comments. Nice to hear that we’re on the same page in terms of processing. 🙂
I love sunburst! Great post. And to answer your question, the sun is moving from left to right in your photo.
Thanks Mike! And you’re correct, it’s moving left to right, but it’s also moving upward, as Jerry points out below.
Assuming Mike is correct… why isn’t the sun moving upward in the frame. If you are facing due east…
Jerry, as I said in my response to Mike, yes, it’s also moving upward. So the sun is moving diagonally from lower-left to upper-right in this photograph. The sun always moves left to right in the northern hemisphere, and upward in the morning, downward in the afternoon. As you get closer to the equator, or closer to the summer solstice, the sun moves more up and down than left to right, and as you get closer to the north pole, or to the winter solstice, the sun slants across the sky more and moves more left to right than up and down, but the basic directions are the same.
I have tried to get sunburst shots, but I always end up with lens flare. How do you avoid lens flare and get the sunburst like that? What am I missing?
Jason, it’s the part about partially hiding the sun behind something, like a trunk, branch, or leaves, that is key to avoiding lens flare. You really want just the edge of the sun showing; any more than that and you’ll get flare. With a trunk or thick branch, I’ll set up my tripod behind the trunk while I figure out the composition and exposure, and by the time I’m ready the sun will probably be ready to edge out from behind the trunk. I’ll take a series of exposures, because as the sun becomes more visible you’ll get more of a sunburst effect, but at some point you’ll also get flare, and it’s hard to tell sometimes exactly when that happens until you see the photographs later. So I just keep shooting until I’m sure I’ve got flare.
If you shoot it through something like a lot of small branches you can get multiple flares. It’s hard to control, and can be overwhelming in that it can distract… unless of course the burst itself is the subject…!
Hi Michael,
Beautiful picture. Just a quiet pond with radiant sun shining through quakies. Thanks for sharing your experience with sunbursts in the field.
Wei
Thank you very much Wei — I really appreciate your comments.
Great info Michael. I stumble onto pictures like this and for some reason have gotten this same effect. Your info about hiding the sun tells me why sometimes the sun is just a huge blob of light as apposed to this nice star burst. Ordered your book on Landscapes and LR5. Can’t wait to learn more of your simple down to earth teaching.
Carol
Thanks Carol. Actually I think you can get the starburst effect even without partially hiding the sun. The reason for partially hiding the sun is to avoid flare. Probably the difference you’re seeing is due to the aperture setting. You need a small aperture like f/16 or f/22 to get the starburst effect, though someone just told me that they can get it at f/11. Probably depends on the lens. Anyway, I hope you enjoy the ebook!
Thanks for the good review on sunburst photography..
Per the apparent sun movement in the sky, in an update, the Photographer’s Ephemeris now will show the sun arc travel and display shadow lines (Geodetic Calculator and Visual Search screens). Wonderful tool for landscape shooters – use it all the time.
What version of TPE is this you’re referring to, Don…? I have 1.1.1 I went to the website, and that appears to be the current version, but I am not finding the Geodectic Calculator or Visual Search screens or any reference to them.
Thanks,
Jerry
Jerry: go to ephemeris multiday, the calculator is the two ballons (4th window); move the gray then time and in the wave pattern screen (3rd window) and this shows shadow length (gray text). I personally use emphemeris fo planning, then gps tuner for location & actual shadow regions (rarely, I can see where shadows fall, good for canyons prior to sun); I hang my hat on sun seeker & moon seeker apps for azimuth, elevation & path on location.
Thanks Mitch: Are you sure that’s the same thing that Don is referencing…? He mentions two different screens, one of which he says displays “shadow lines”. I suspect shadow length and shadow lines are two different things.
Michael, Do you use any tools like this when you’re planning a shoot…?
Thanks!
Jerry
Jerry, yes, I use TPE all the time, and now also PhotoPills (an iPhone app). But I don’t know TPE inside out, and I’m not sure about exactly what Don is referring to either.
Another informative article, thanks for the time you put into teaching and information. Saving my pennies for a workshop :). I’ve been playing with a techniques for landscape by Jack Davis; setting clarity prior to shadows: a workflow of exposure, clairity then shadows & highlights. What do you think..?
Thanks Mitch. I’m not sure about setting Clarity first. Maybe if you add a lot of Clarity, which I usually don’t. If you’re using Clarity sparingly, it’s a pretty minor adjustment compared to all the tonal controls, so I’d rather leave it for later, but it doesn’t really matter that much which order you do it in, because you can always go back and change something. I spell out my Lightroom workflow in detail in my Landscapes in Lightroom 5 ebook/video package.
While I have slowed w/ reference material, I bought into the package. Your mix of personality and tech made it a need. Thank you. Its a boost…
Hi Michael, great article. Did you use a polarizer and ND filters on this photo and how do you keep from looking directly into the sun?
Thanks Stephen. No filters; as I mentioned, I used Highlights, Shadows, and the Graduated Filter tool in Lightroom to balance the contrast. You obviously have to be careful about looking into the sun, so I just steal quick glances in that direction, which is enough.
Hello Michael,
You images have always inspired me and I recently bought and read your latest e-book – Landscapes in Lightroom 5. Communicating your knowledge and expertise in a clear and concise manner through editing images and illustrating key aspects with video worked very well for me and expanded my photographic horizons. Understanding the photo editing choices you made to support the vision you had in mind when making those pictures was of enormous value to me and I thank you for sharing your photographic vision.
Thanks so much Richard for the kind words. I’m very glad that you have enjoyed and learned from the ebook, and I appreciate your taking the time to write.
Thanks for sharing Michael, it’s posts like this that certainly help bring a extra dimension to my photography.
I also enjoyed the way you showed the original raw image. I feel it’s something that many photograaphers would be afraid to do, as many of these shots where the sun appears can turn about to be rescued in photoshop with the pixels pused around quite a bit. Obviously it’s not the cse in your image.
Initially, for a second I thought you had fused two or more exposures, but I guess the leves of the trees were almost transparent, thus allowing the light through?
Speaking of flare, I assume you shoot with top end lenses (unlike me). Do you find a notable reduction in flare or a ‘nicer’ flare, if say, you shot at the sun directly with a more expensive lens?
Thanks,
Francis
You’re welcome Francis, and thank you!
I have no problem showing the Raw file — I do that in workshops and in my ebooks too. No secrets here!
Yes, the leaves were translucent, as all leaves are. You can see that some lower parts of the trees were darker since they were still in the shade. And I brought out quite a lot of shadow detail in Lightroom.
I can’t say whether lens quality makes much difference in seeing flare, as I haven’t compared different lenses side-by-side in flare-including situations. If you include the sun in the frame without anything to even partially block it, you’re going to see flare regardless of the lens, but I’m sure that exactly how the flare manifests itself will vary.