I used the new Range Mask tool in Lightroom Classic CC to improve the green colors in this photo from Rabbit Ears Pass in Colorado
Adobe announced two new, different versions of Lightroom last week. And, unfortunately, the names have created a lot of confusion. Here are the essential things you need to know:
No More Perpetual License
Adobe will no longer make new standalone versions of Lightroom with a perpetual license. That means new versions of Lightroom will be available by subscription only. Lightroom 6 is the last non-subscription version that you can purchase outright. Lightroom 6 is still available for now, but won’t be updated to support new cameras. (You can still use Adobe’s free DNG converter to convert Raw images from new cameras into the DNG format, then import those DNG files into Lightroom 6.)
New Lightroom Classic CC
The new version of the program we’re familiar with is called Lightroom Classic CC. This is the traditional, folder-based version of Lightroom. It is essentially the same as Lightroom CC 2015, but with performance improvements and a new Range Mask tool that allows you to make more precise selections with the Adjustment Brush, Graduated Filter, and Radial Filter.
New Lightroom CC
What’s now called Lightroom CC is a new program that can be called the cloud-based version of Lightroom. The biggest advantage to this new version is that original image files can be stored in the cloud, and then synced across all your devices, so changes made on one device will sync to all your other devices. (For example, changes made on your laptop will sync to your desktop, phone, and tablet. Or changes made on your phone will sync to your tablet, laptop, and desktop.) It also has completely new code, which should improve its performance and make it less buggy.
However, this new cloud-based version lacks many important features found in Lightroom Classic CC. Its organization and features are similar to the Lightroom Mobile app (now called Lightroom CC). You could all it Lightroom Mobile for the desktop.
Should You Use Lightroom Classic CC or Lightroom CC?
I’ll be sticking to Lightroom Classic CC, and I think most people serious about image processing will too – at least for now. The new Lightroom CC (the cloud-based version) is missing too many important features. Here’s just a partial list:
Missing from Lightroom CC:
• Ability to store images on multiple hard drives (everything must be on the same hard drive)
• Organizing by Folders (all images must be in the same folder)
• Survey View and Compare View
• Ability to Rename photos
• Keyword hierarchies
• Smart Collections
• Tone Curve
• HDR Merge
• Panorama Merge
• Custom Defaults
• Sync Settings
• History
• Snapshots
• Soft Proofing
• Export TIFF, PSD, or DNG files (you can only export in the original format and as JPEGs)
• Export with watermark
Adobe will probably add many of those features to the cloud-based Lightroom CC over the coming months, but for now that list is just too long to make it a useful program for my purposes.
And for now I don’t recommend using Lightroom Classic CC and Lightroom CC together, as they weren’t designed to work that way. I’m going to do some experimenting with the new Lightroom CC app, but it appears that keywords won’t sync properly between the two, and Develop changes seem to only sync from Lightroom Classic CC to Lightroom CC, but not the other way around.
You can still use Lightroom Classic CC with the mobile app for phones and tablets (now called Lightroom CC), and Develop settings will sync between the two (both ways), just as they have for the last few years. And you can now add keywords in the mobile app, and search for images by keyword (yay!), but keywords don’t seem to sync properly between Lightroom Classic CC and the mobile app (boo!). (I’m still experimenting with all this, so I’ll update this post if I find a way to make the keywords sync correctly, or encounter any other syncing issues).
A Big New Feature
Perhaps lost in all the confusion about these two new versions of Lightroom is that Lightroom Classic includes a significant new feature: the Range Mask.
The Range Mask works in conjunction with the local adjustment tools (Adjustment Brush, Graduated Filter, and Radial Filter). It allows you to refine a selection based on luminosity or color, in order to adjust a precise range of tones or specific range of colors within part of the image.
So, for example, if you want to darken just the very lightest tones in part of an image, you can do that easily, without having to spend an hour painting over just those areas. Or you can select a specific range of colors, like, say, greenish-yellow, and change their hue in just part of the photograph (or all of it).
Before, you could adjust a specific but rather broad range of tones with the Highlights, Shadows, Whites, and Blacks sliders available within the local adjustment tools. Or you could check Auto Mask with the Adjustment Brush. But those methods had (and have) pretty severe limitations. The new Luminance Range Mask allows you to make much more precise and sophisticated selections.
And you could previously adjust particular colors in the HSL panel, but only across the entire photograph, not just part of it. And even then you could only adjust a rather broad range like “Yellow,” or “Green.” The new Color Range Mask lets you get much more precise about exactly what color(s) you’d like to modify, and do it within only part of the photograph.
Photoshop’s tools still offer more control and sophistication for making a luminosity mask than the new Luminance Range Mask in Lightroom. But Lightroom’s Luminance Range Mask is a powerful tool, and will allow me to stay in Lightroom and avoid using Photoshop more often, streamlining my workflow.
On the other hand, Lightroom’s new Color Range Mask, combined with the Color Picker, allows you to adjust individual colors in a somewhat different way than Hue/Saturation, or any other Photoshop tool. I think the Color Range Mask is an exceptionally powerful tool for adjusting the hue or brightness of a specific color, and I anticipate using it a lot.
Here’s a before-and-after example of recent photograph from the eastern Sierra where I used the Color Range Mask to lighten and (slightly) change the hue of the green and gold leaves:

Before using the Color Range Mask to lighten the green and gold leaves in this photo from the eastern Sierra
Here’s a quick description of how to use the new Range Mask. The Range Mask is a rather complex (and powerful) tool, so this is a basic outline which assumes you already know how to use the Graduated Filter, Radial Filter, and Adjustment Brush:
1. First, make a selection with either the Graduated Filter, Radial Filter, or Adjustment Brush. With the Adjustment Brush, for example, start by painting over the part of the image you’d like to modify. (You don’t have to get very precise about this, as it’s just a starting point.)
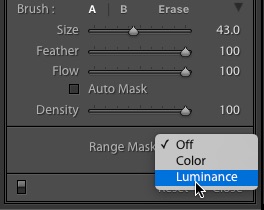
2. Next, near the bottom of the panel, change the Range Mask from Off to either Color or Luminance:
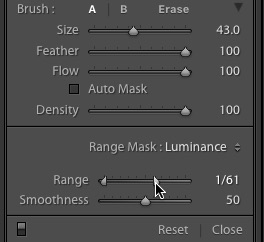
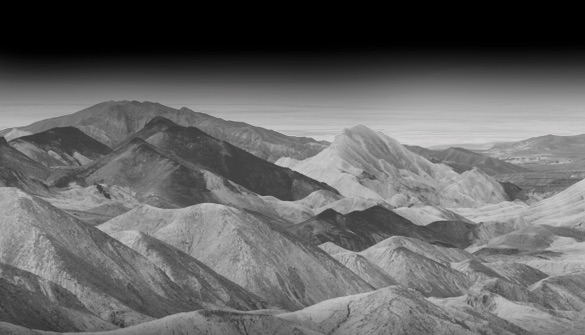
3. For a Luminance mask, adjust the Range sliders to define the tones you want to modify. Then move the Smoothness slider to expand or narrow that range. You can hold down the Option (Mac) or Alt (Windows) key while moving these sliders to see the mask (or press O to see the mask as a colored overlay on the image):

The Range sliders control the range of tones (from 0 to 100) affected by the adjustment. The Smoothness slider further refines the selection.

Hold down the Option (Mac) or Alt (Windows) key while adjusting the Range or Smoothness sliders to see the mask. White is selected, black is deselected, gray is partially selected.
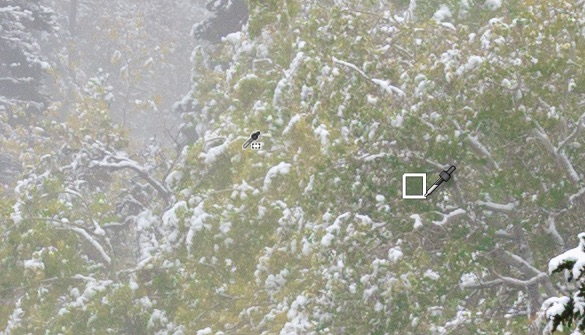
4. For a Color Range Mask, use the eyedropper to click on the color(s) you want to modify. You can hold down the Shift key to sample multiple spots (up to five), and you can also click and drag a rectangle for greater accuracy. Then adjust the Smoothness slider to further refine the range of colors in your selection. Again, hold down the Option (Mac) or Alt (Windows) key while moving the Smoothness slider to see the mask, or press O to see the mask as a colored overlay:

For a Color Range Mask, use the eyedropper to select the color(s) you want to adjust. You can click on up to five spots. Dragging a rectangle around an area improves accuracy.
5. Expand or contract the area the mask is being applied to with the normal tools for the Graduated Filter, Radial Filter, or Adjustment Brush. With the Adjustment Brush, for example, use the A or B brush to add to the selection, or the Erase brush to subtract from it.
6. Use any of the Effect sliders (Temp, Exposure, Contrast, Highlight, Shadows, Saturation, etc.) or the Color Picker to lighten, darken, or change the color within the area you’ve defined with the mask.
What’s in a Name?
The names Adobe chose for the two new versions of Lightroom make you scratch your head, and have invited deserving comparisons to the Coke Classic fiasco. Adobe could have avoided a lot of confusion by simply giving the new, cloud-based version of Lightroom a different name.
But I’m sure we’ll get used to the names, and in the meantime we get to use a powerful new feature in Lightroom Classic CC: the Range Mask. And it will be interesting to see how the new cloud-based app (Lightroom CC) evolves.
— Michael Frye
P.S. I’ll be updating my Landscapes in Lightroom ebook to include the Range Mask tool. The new edition will be free, of course, to anyone who has previously purchased the ebook.
Related Posts: Lightroom eBook Updated!; Lightroom’s New Dehaze Control
Michael Frye is a professional photographer specializing in landscapes and nature. He is the author or principal photographer of The Photographer’s Guide to Yosemite, Yosemite Meditations, Yosemite Meditations for Women, Yosemite Meditations for Adventurers, and Digital Landscape Photography: In the Footsteps of Ansel Adams and the Great Masters. He has also written three eBooks: Light & Land: Landscapes in the Digital Darkroom, Exposure for Outdoor Photography, and Landscapes in Lightroom: The Essential Step-by-Step Guide. Michael has written numerous magazine articles on the art and technique of photography, and his images have been published in over thirty countries around the world. Michael has lived either in or near Yosemite National Park since 1983, currently residing just outside the park in Mariposa, California.


Thanks very much for this extremely clear article explaining the differences. Just very useful!
You’re welcome Andrys – glad you found this helpful
Thanks for lifting the veil, Michael. Great article!
Thanks Charlotte! We’re all scratching our heads over the marketing decisions Adobe made with all this. A million people think they could have done a better job than Adobe’s marketing department… and a million people are probably right.
Thank you for clarifying Adobe’s new Lightroom version release. What was their marketing team thinking when coming up with the naming scheme?
Good question! A head scratcher for sure.
Are any of you faithful Adobe folks switching to other editors; Luminar, Affinity, On1, Capture one Pro, Photo Mechanics for DAM…..I would like to leave Adobe subscription but they offer so much compared to the other choices. I would really like to know the realistic alternative. Thanks
I am planning on sticking with 6 as long as it is viable while waiting and hoping for the competition to mature.
I am not a fan (understatement) of subscription software, and I believe in voting with my wallet. Which, of course will have no impact on where Adobe is headed, sigh. I’ve used LR since version 1.
Well I can’t speak for anyone else, but I haven’t explored those other options thoroughly. I’ve played around with Capture One and DXO, but I would have to learn a program pretty thoroughly to evaluate it properly, and that’s a big time investment.
Yeah, that’s the problem. Is it worth the time investment to try and find an acceptable alternative?
And Adobe’s move here shows they are counting on that hurdle being big enough for the people it bothers that they will not be harmed. Definitely a good business move on their part especially since plenty of people are clearly fine with the subscription model.
Thanks for this breakdown, Michael. And I can’t wait to explore the update on the masking tool. Def a marketing bomb.
You’re welcome Stacy!
And can’t wait for the upcoming LR workshop!
When I updated Lightroom CC, I didn’t really understand the difference between the two Lightroom options. First, I updated to Lightroom CC. Now, I have updated to Lightroom Classic CC. Do you recommend uninstalling Lightroom CC? Many thanks for your clear explanation of the differences between these two.
I don’t think you need to uninstall the new Lightroom CC. I don’t think they’ll conflict with each other, but just make sure you’re using the Classic version (which isn’t hard, as they look very different).
Thank you Michael for a most informative article concerning Lightroom Classic CC and Lightroom CC. After reading and digesting it, I think for my purposes I’ll stick with a standalone version of Lightroom 5 and Elements that I’m comfortable with. What is your opinion of ON 1 Photo RAW 2018 if you are familiar with it?
Carol
You’re welcome Carol. Just so you know (and that goes for anyone else reading this), using Lightroom Classic CC is not that different from using Lightroom 5. The only difference is that there are a few additional features, like the Panorama Merge and HDR Merge, the Dehaze tool, and the new Range Mask tool with local adjustments. I haven’t tried ON1 Photo Raw.
Michael,
Thanks!
Cheers,
Alyn
Michael, do you know just how far the new Lightroom CC has progressed to being truly and fully cloud-based SaaS? It is clear they’ve taken the step to require that the Adobe Cloud is the data repository for the catalog and images.
But where does the new Lightroom CC image processing software reside and execute? On Adobe’s servers? or is the software still installed on the client’s platform and executes there (as in Lightroom Classic)?
The software resides on your computer. As I understand it, you can choose to store the images either exclusively in the cloud, or both in the cloud and on a local hard drive.
Thank you for that info.