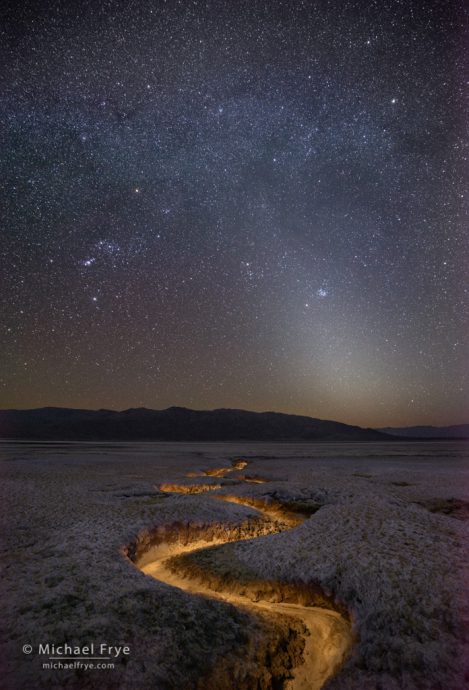
Stars, Orion, and zodiacal light over an eroded gully, Death Valley. Robert Eckhardt, Claudia, and I found this twisting gully while scouting for the workshop, and I thought it might line up well with Orion and the zodiacal light just after dark. It was actually Robert’s idea to light-paint the gully, though he didn’t join me on the night I photographed it. The focal length had to be very wide (16mm) in order to fit everything in the frame. I made eight exposures for the sky, each at 15 seconds, f/4, ISO 12,800, and blended those together with Starry Landscape Stacker. I made another longer exposure to record more detail in the landscape (4 minutes at f/4, ISO 6400). Then I captured four light-painting frames, adding a little light from the right and left, and tracing the gully with a flashlight as I walked beside it. All these images were blended together in Photoshop.
Death Valley has been used as the setting for many Hollywood movies. Not surprisingly, some of these films use the austere, other-worldly landscapes of Death Valley as a stand in for another planet. (This includes two titles from the original Star Wars series – Episode IV: A New Hope, and Episode VI: Return of the Jedi.)
This same other-worldly feeling works beautifully for night photography. I’ve made many nighttime images in Death Valley, and had a chance to capture a few more both before and during our recent workshop there. We had some challenging conditions at times, with wind, and plenty of clouds. But we also had one clear, calm night out in the dunes.
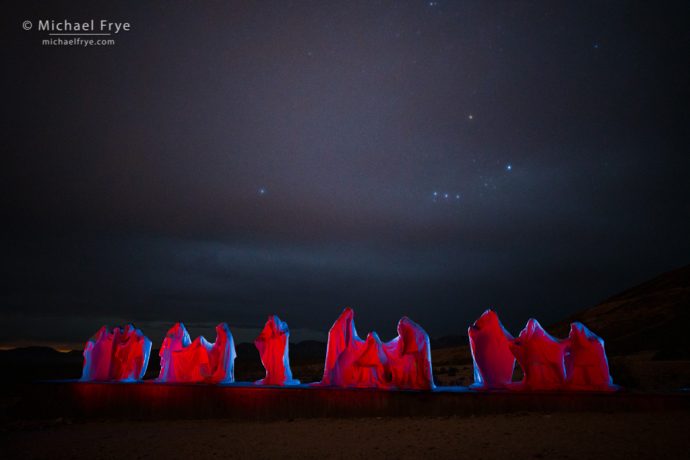
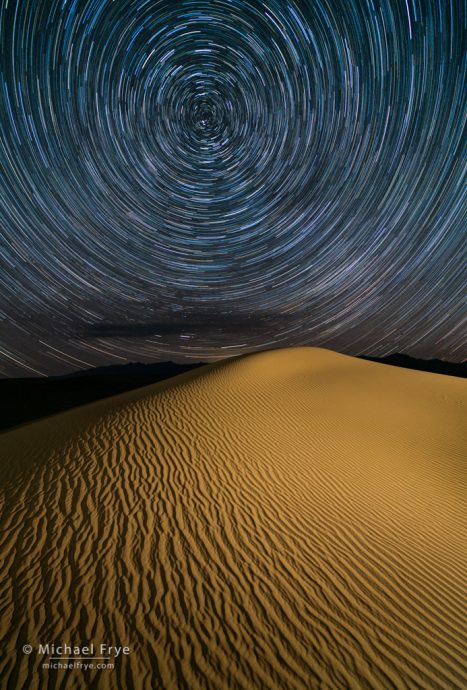
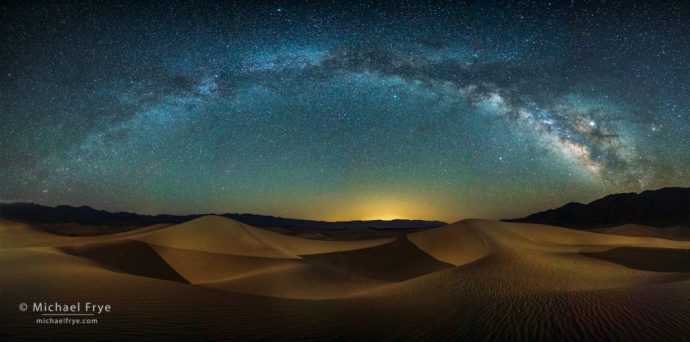
Night photography can get quite complex. All four of the images shown here involved multiple exposures, for various reasons. With the dune panorama I stitched five images together in order to fit the entire arc of the Milky Way in the frame. With the other images the camera stayed locked on the tripod, but multiple frames were used to blend exposures for the sky (either pinpoint stars or star trails) with light-painting images. I’ve included detailed captions to explain how each photograph was made.
— Michael Frye

“Last Supper” sculpture at night, Rhyolite, Nevada. We had lots of clouds on the first night of the workshop, so I decided to take the group to Rhyolite, which I thought would work even without many stars in the sky. We photographed one of the old buildings, then tried lighting this sculpture of the Last Supper by Belgian artist Albert Szukalski. At one point Orion poked out the clouds, adding a few stars to the scene. This image is a blend of five exposures: one for the sky, and four light-painting frames. One of our participants, Al, tried using his red headlamp to light the front of the figures, and that worked really well.

Sand dune and star trails, Death Valley. On our night in the dunes we found this beautifully-rippled dune that aligned with the North Star. My star-trail sequence consisted of 15 frames, each 4 minutes at f/4, ISO 800. These were blended together in Photoshop, along with two frames where we light-painted the dune from the left and right.

Milky Way over sand dunes, Death Valley. We captured panoramas of the Milky Way during the wee hours of the morning. This image consists of five frames stitched together with Lightroom’s Panorama Merge. I used my 16-35mm zoom at 16mm, and each frame was 30 seconds at f/4, ISO 6400. We set up three continuous, low-level lights to illuminate the dunes.
Related Posts: Earth Textures; Death Valley under the Moon and Stars; Lunar Eclipse over Death Valley
Michael Frye is a professional photographer specializing in landscapes and nature. He is the author or principal photographer of The Photographer’s Guide to Yosemite, Yosemite Meditations, Yosemite Meditations for Women, Yosemite Meditations for Adventurers, and Digital Landscape Photography: In the Footsteps of Ansel Adams and the Great Masters. He has also written three eBooks: Light & Land: Landscapes in the Digital Darkroom, Exposure for Outdoor Photography, and Landscapes in Lightroom: The Essential Step-by-Step Guide. Michael has written numerous magazine articles on the art and technique of photography, and his images have been published in over thirty countries around the world. Michael has lived either in or near Yosemite National Park since 1983, currently residing just outside the park in Mariposa, California.


The picture at the top is very interesting, and all the pictures are beautiful night photos!
Thank you Hong!
Michael,
These images are just knockouts!!! I can’t stop returning to Them!
So magical and ethereal!! Bravo Sir!!
Thanks so much Denny! I’m glad you like these.
the pictures are very nice … inspiring as well as the beauty and the theme…
Thank you Dusan!
It is great to see your wonderful photos, especially since I was also in Death Valley and Rhyolite earlier this year. I’m wondering why you used F/4. I’m considering Canon 16-35 lenses and was thinking that the 2.8 would be the better choice for night photography.
Thanks Randy. The first and last photos were made at f/4 because that’s the widest aperture on my 16-35mm zoom. Yes, an f/2.8 zoom would generally be better for night photography (if it’s sharp and coma-free in the corners at f/2.8). But my f/4 zoom is smaller and lighter, and therefore a better choice, for me, for 99% of the photos I use it for. I mostly use my Rokinon 20mm lens for night photography, but it wasn’t quite wide enough for those two images.
Shooting at f/4 is actually not that much of a handicap when you do star-stacking, as I did with the first image, because you can shoot at a higher ISO yet reduce the noise considerably by blending the images. And with the panorama, although I didn’t do star-stacking because of the extra time that would have required, the extra resolution gained by stitching five images together reduces noise – not at the pixel level, but in the final print, since each pixel will be smaller in the print. Plus the extra-wide view allowed me to use a 30-second shutter speed without the stars becoming streaks, so more light was gained that way (compared to the typical 15- or 20-second exposure for pinpoint stars), allowing a reasonably-low ISO of 6400.
You don’t need a super-wide aperture for star trails, so I usually use f/4 to get a little more depth of field. The stars for the sculpture photo were captured at f/1.4 on a borrowed Sony 24mm lens.
Many thanks Michael. Your beautiful photos are inspiring and your clear explanations of how you go about making them are very helpful.
Hi Michael,
I just love the eroded gully shot, and the pano of the Milky Way. Thanks for giving some details on how you approached them.
I keep wondering with star trails if it is possible to reduce the number of trails to make them less “busy”…
Thanks Doug. I like all the star trails, but if you want to show fewer trails you can use a smaller aperture or lower ISO so that faint stars don’t show up. You’d have to compensate for the lower ISO or smaller aperture by making exposures longer than four minutes, otherwise the sky would be too dark.
Wow, great images!
Thanks Marvin!
Fantastic Images As Usual Michael, I Am Gob Smacked, They Are “WOW” = 100%.
Thank you John!