Winter sunrise from Tunnel View, Yosemite NP, California
After all our travels, Claudia and I are back home. Yesterday I drove up to Yosemite Valley before sunrise, as a small storm was clearing.
Looking at the weather models the night before, I didn’t have high hopes for this sunrise. Although I thought there could be a light dusting of snow, it appeared the storm would clear in the middle of the night, which usually means the fog and mist will dissipate by morning. But I set my alarm for 4:00 a.m. just in case. And when I awoke I could see that clouds and scattered showers had lingered all night, so there should still be some mist. And it also looked like skies would start clearing shortly after sunrise. So no going back to bed – time to go!
And it turned out to be a beautiful sunrise. I started at Tunnel View before moving on to the valley floor. At first the skies were almost completely overcast, but then clear patches started to appear, and clouds began to light up overhead. And then the clouds started turning color above El Capitan and Cathedral Rocks – as in the photograph above.
For this image I auto-bracketed exposures (three shots, two stops apart) to get detail in both the bright clouds and darker foreground. Then I blended those exposures with Lightroom’s HDR Merge.
This blended file had all the information I needed, but photographs like this can still be difficult to process. It’s challenging to darken the highlights and brighten the shadows in a natural-looking way, and not make the image look too flat. Lightroom’s Highlights and Shadows sliders can help, but if you try to do everything with these global adjustments the image often ends up looking flat and lifeless – and weird.
Instead, while I might do part of the work with the Highlights and Shadows sliders, I do the heavy lifting with local adjustments in Lightroom’s Masking Panel. These local adjustments allow me to selectively lighten and darken individual parts of the photograph, balancing the bright and dark areas, while retaining contrast everywhere. I think this makes the resulting image look livelier and more natural.
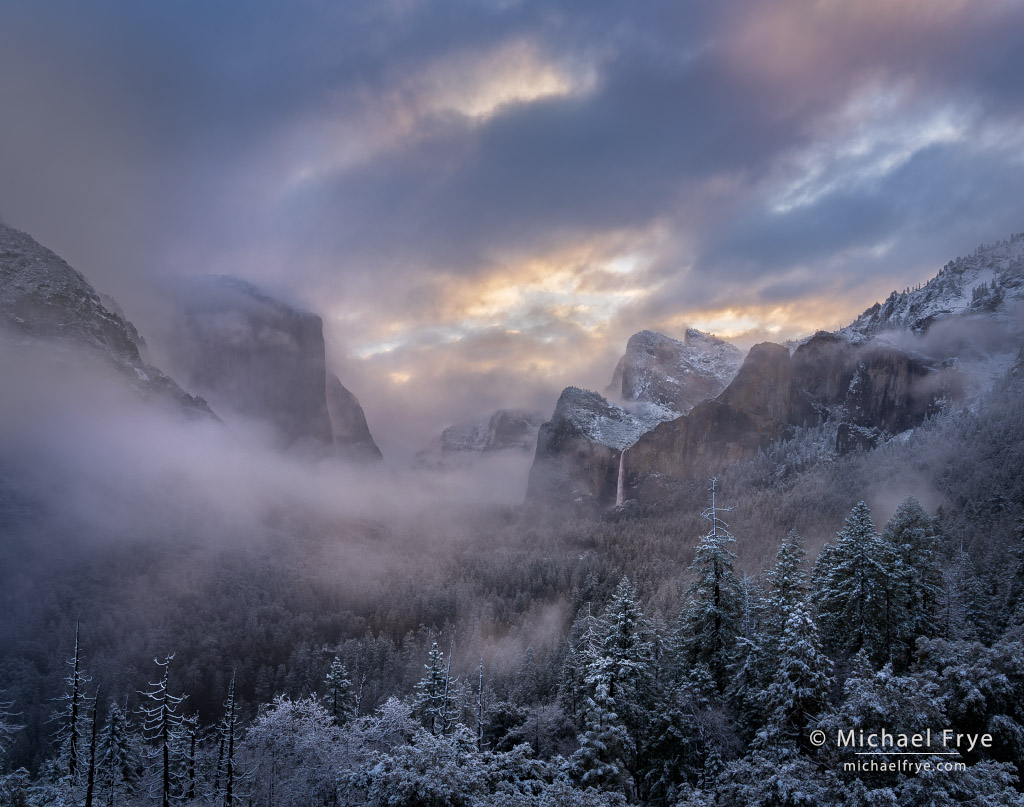
Here’s what this photograph looked like before and after making all the local adjustments in Lightroom’s Masking Panel:
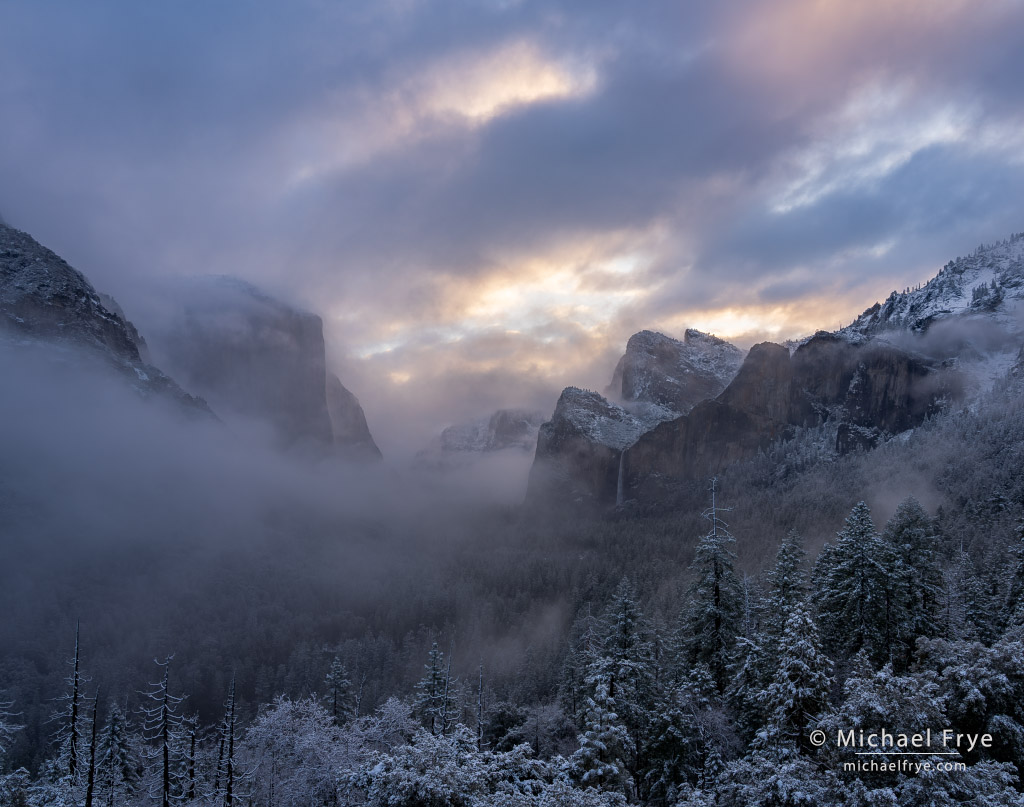
With global edits, but before making local adjustments
The final image after making local adjustments with Lightroom’s Masking panel
That’s a pretty substantial difference. I don’t usually make such strong edits, but sometimes that’s necessary to bring out the detail in highlights and shadows, and make a rendition that more closely matches what I saw at the time. I also wanted to direct the viewer’s eye – to draw attention to interesting areas that helped convey the mood and message of the photograph, and draw attention away from places that were less interesting, or distracting.
To do all that, the local adjustments to this photograph include not only dodging and burning (lightening and darkening specific areas), but also selectively adding or reducing contrast, and subtle color tweaks. I did most of the work with just the Brush, but I also used other tools to make more precise selections when necessary.
Most images don’t require such strong local adjustments. But I haven’t met a photograph that couldn’t benefit from at least some minor dodging and burning. By making some areas more prominent, and other areas less prominent, you can direct the viewer’s eye, enhance the photograph’s message, and better convey the mood and story you were hoping to express when you picked up the camera. To me, local adjustments are the heart of image processing, and what I spend 90% of my time on.
Of course there’s much more to this topic, so this Saturday, March 8th, I’ll be conducting a live Lightroom webinar called Painting With Light, which is all about making local adjustments with Lightroom’s Masking panel. We’ll delve into all the basics, but also cover important topics that don’t get discussed as often.
For example, if you’re going to try to direct people’s eye in a photograph, what things draw people’s attention in the first place? How do you decide what to emphasize, and what to de-emphasize? And then, how can you make some things stand out, and others recede? It’s not just lightening and darkening; there are many other ways to direct the viewer’s eye in a photograph.
I hope you can join us live on Saturday, but if not the webinar will be recorded, so you can watch it anytime. You can find more information or sign up here:
Lightroom Webinar: Painting With Light
March 8th, 2025, 10:00 a.m. Pacific Time (1:00 p.m. Eastern Time). The webinar will be about 90 to 120 minutes long.
$27
I hope to see you at the webinar!
— Michael Frye
Michael Frye is a professional photographer specializing in landscapes and nature. He lives near Yosemite National Park in California, but travels extensively to photograph natural landscapes in the American West and throughout the world.
Michael uses light, weather, and design to make photographs that capture the mood of the landscape, and convey the beauty, power, and mystery of nature. His work has received numerous awards, including the North American Nature Photography Association’s 2023 award for Fine Art in Nature Photography. Michael’s photographs have appeared in publications around the world, and he’s the author and/or principal photographer of several books, including Digital Landscape Photography: In the Footsteps of Ansel Adams and the Great Masters, and The Photographer’s Guide to Yosemite.
Michael loves to share his knowledge of photography through articles, books, workshops, online courses, and his blog. He’s taught over 200 workshops focused on landscape photography, night photography, digital image processing, and printing.


