Night photography offers wonderful opportunities to be creative. The low light allows you to use long exposures to record movement, like star trails or moonlit clouds. And since the natural light is so dim, you can easily overpower it with a flash or flashlight and add your own light to a scene.
That aspect of night photography—light-painting—has intrigued me for a long time. Adding your own light to a nighttime scene gives it a new dimension; it instantly transforms the landscape into something different, something we never see in real life, and adds a mysterious, surreal element to the photograph.
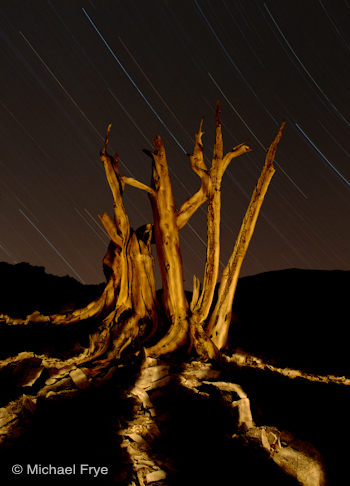
The accompanying image has both movement, in the form of star trails, and light-painting. I used a flashlight to trace the branches of this bristlecone pine snag, then painted zig-zag lines over the rocky foreground. I made this photograph with medium-format film back in September of 2000. Some test exposures with a Polaroid back helped me get the light-painting right, then I switched to real film (probably Provia), did the light-painting again, and then left the shutter open for another 90 minutes to record the star trails. You can see more examples of my light-painting techniques in my nighttime portfolio.
I learned light-painting with film, which was a slow trial-and-error (mostly error) process. Digital cameras make the learning curve much easier, because you can experiment and see the results immediately. If you’ve never tried night photography before this might be a fun summertime project—a way to stretch yourself a little and exercise your imagination. Summer is a great season for photographing landscapes at night, since the Milky Way is prominent, and the warm nighttime temperatures make it more comfortable to stay out late.
Whether you’re an experienced night photographer or a beginner, I recommend reading Lance Keimig and Scott Martin’s excellent book Night Photography: Finding Your Way in the Dark. Also, you can find tips about focus and exposure for moonlit landscapes in my post about photographing lunar rainbows.
And if you prefer hands-on learning there’s still space in my Full Moon Night Photography workshop later this summer (July 31st and August 1st). This is a great way to get personalized instruction and learn night photography in a fun, supportive group atmosphere. Rooms have been set aside for this workshop in Yosemite Valley and are still available if you register soon.
—Michael Frye
Related Posts: Under the Full Moon; Tips for Photographing Lunar Rainbows; Also, see images made by participants in last year’s night photography workshop in this Flickr group
Michael Frye is a professional photographer specializing in landscapes and nature. He is the author and photographer of The Photographer’s Guide to Yosemite, Yosemite Meditations, and Digital Landscape Photography: In the Footsteps of Ansel Adams and the Great Masters, plus the eBooks Light & Land: Landscapes in the Digital Darkroom, and Exposure for Outdoor Photography. He has written numerous magazine articles on the art and technique of photography, and his images have been published in over thirty countries around the world. Michael has lived either in or near Yosemite National Park since 1983, currently residing just outside the park in Mariposa, California.


I bought the night photography book based on your recommendation. It’s great. I hope that you get a commission…
Haha – I’m not getting a commission, but Lance and Scott deserve whatever royalties they’re getting.
I LOVE this shot. Thanks for the book recommendation.
Nightphotography is fun and you can get some really interesting pictures like these:
http://www.flickr.com/photos/64152254@N05/7639544970
http://www.flickr.com/photos/64152254@N05/7584981052
http://www.flickr.com/photos/64152254@N05/7537717864
………
Do you that with film is a bit challenging and complicated, as you said digital cameras make it easier and you see right away the result.
The downside with digital camera is that it is not feasible to leave the shutter open for 30min and longer. For star trails you then have to stack several shorter exposures which leaves a gap in the trail when you look at the picture at 100%.
Enrico
Yes, you have to stack images for star trails with digital cameras, which is more difficult than just leaving the shutter open. But stacking also allows you record long star trails on moonlit nights without overexposing the photograph, something you can’t do with just one long exposure.
With digital cameras stacking is pretty much the best option you have if you want to have a total exposure of more than 30min, even 30min exposures can get really ugly with noise (noise can big fixed but at 30min and longer only partly).
Stacking is not difficult and there is free software to do that. You just save all pictures (lens correction applied) start the stacking software, add them, click the button to stack and watch how the trail/circle is created, save the picture > done. Then you can of course make some adjustments to the stacked picture in your favorite picture editing program.
As I first started trying to do startrails with my DSLR, I was confused and thought it would be complicated but it is really easy.
If you want to do big prints of the startrail picture then doing a film/analog one shot long exposure is maybe better if you don’t want to deal with the gaps you get with stacking.