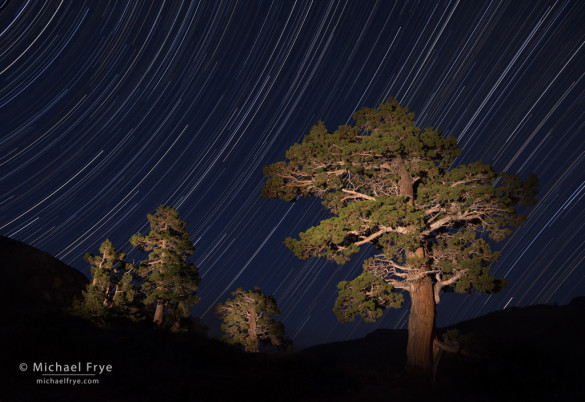
Star Trails and junipers east of Sonora Pass. Lightroom’s retouching tools keep getting more sophisticated; Lightroom 5’s Advanced Healing Brush was very helpful in removing jet trails from this image.
Adobe just released Lightroom 5.2, with a small but significant new feature: the ability to add feathering to the Spot Removal Tool’s brush. This adds further sophistication to Lightroom’s retouching abilities, continuing the theme introduced by the “Advanced Healing Brush” in Lightroom 5.0.
You usually want fairly hard-edged brushes with retouching tools, otherwise you’ll get unwanted blurring along the borders of your retouching areas. But small amounts of feathering can help make transitions smoother and the retouching less obvious. Try setting the Feathering in the Spot Removal Tool to 40 as a starting point, then modify it if necessary. And in keeping with Lightroom’s complete flexibility, you can adjust the feathering after the fact: you can place a spot or add a brush stroke, then adjust the feathering of that area to see the effect of different feathering amounts.
As I said, this is a small improvement, but a helpful one, and something worth paying attention to if you’re a Lightroom user. Naturally 5.2 is a free upgrade if you own Lightroom 5.
And while we’re on the subject, I’ve found the Advanced Healing Brush to be extremely helpful. This is a new capability added to the Spot Removal Tool in Lightroom 5.0, allowing you to brush over an area you want to retouch instead of using a series of discrete spots. It’s made my retouching in Lightroom more efficient, and allowed me to use Photoshop less and stay in Lightroom more. I’m curious about whether others have also found this new feature helpful—let me know how you like it.
— Michael Frye
Related Posts: Lightroom 5 Beta; My New eBook is Now Available!
Did you like this article? Click here to subscribe to this blog and get every new post delivered right to your inbox!
Michael Frye is a professional photographer specializing in landscapes and nature. He is the author or principal photographer of The Photographer’s Guide to Yosemite, Yosemite Meditations, Yosemite Meditations for Women, and Digital Landscape Photography: In the Footsteps of Ansel Adams and the Great Masters. He has also written three eBooks: Light & Land: Landscapes in the Digital Darkroom, Exposure for Outdoor Photography, and Landscapes in Lightroom 5: The Essential Step-by-Step Guide. Michael written numerous magazine articles on the art and technique of photography, and his images have been published in over thirty countries around the world. Michael has lived either in or near Yosemite National Park since 1983, currently residing just outside the park in Mariposa, California.


What did the “before” look like with the jet trails?
It’s hard to show you that in this image Tom, as this is a composite of 36 different frames. The jet trails were cloned out in Lightroom on some of the original frames, and masked off in Photoshop on other frames.
I find the advanced healing brush to be almost worth the price of the upgrade; a major improvement since LR4! And it eliminates most if not all of this type of spotting clean-up in PS — only if I find something I missed in LR or want to creatively eliminate something from the image will I turn to the spot healing brush in PS
Thanks Michael — I’m glad you’re finding “Advanced Healing Brush” as helpful as I am. It’s been a really welcome addition for me too.
I’ve used the advanced healing brush a few times with mixed results. It’s definitely a nice tool when used in areas like a fairly sky. I’ve had less success in areas that are more complex.
Sean, I had the same reaction when I first started using the brush, but with more experience I’ve been able to get it to work well in more complex areas too. As with other retouching tools, the more complex the area, the more effort and time it takes. Rather than trying to brush over a large, complex area with “Advanced Healing Brush,” try working on smaller sections at a time. Also, clone mode often works better for complex areas than heal mode. And if you don’t quite get it right you can try dragging a new cloning/healing spot over an existing one (something I cover in the videos that accompany my Landscapes in Lightroom 5 ebook).
I haven’t gotten to that part of the book yet…I had jumped right to the sharpening section…the area I tend to struggle the most with! I will give it a longer look the next time I have a more complex area to retouch, anything that saves me from jumping over to Photoshop is well worth a second, third, or fourth, look.
Michael,
What were your camera settings for the 36 images? It looks like you were shooting to the east, is that correct.
Richard
Richard, the star-trail sequence images were four minutes at f/8, 800 ISO. There were also two frames where I light-painted the trees that were shorter exposures, but same ISO and aperture. Yes, I was looking east.
Hi Michael. I find the new healing brush a very nice upgrade. For what I have tried it on, I think it works better than Photoshop CS6’s corresponding tool. It seems to blend more seamlessly with the surroundings. Have you found any difference between CS6 and the Lightroom implementation?
Like you, I go to Photoshop less and less with each new version of LR. I have not tried it since I have upgraded to 5.2, so I have not tried the feathering yet.
Nice star trail photo.
Aram
Aram, I haven’t used Photoshop’s healing brush a lot lately, nor have I tried a direct comparison with Lightroom’s “Advanced Healing Brush,” so I can’t really compare the two. I’ll try that one of these days. Glad you like the star-trail photo!