After our redwoods workshop, Claudia and I drove north and spent a couple of days along the Oregon coast. I’d never been to this area before, so on our first afternoon we scouted a number of locations north of the town of Brookings. We made several short hikes down steep trails to the coast, with correspondingly steep climbs back out. Though we found some nice spots, none made me jump up and down. Sunset was approaching, and I had to decide where to go. I could see some interesting sea stacks to the north, and decided to drive in that direction.
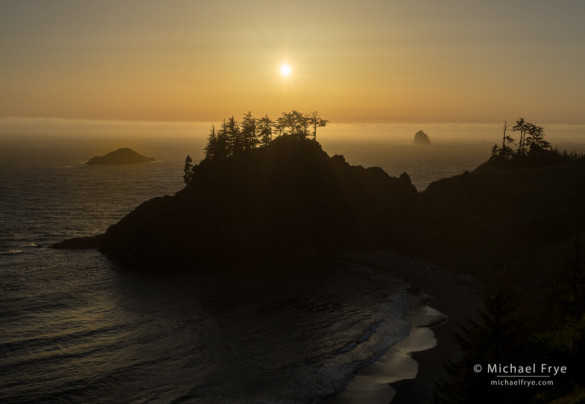
But we never made it to those sea stacks, because before we could get there we checked one more viewpoint, and immediately realized we didn’t need to go any further. We’d found a scene that practically composed itself, with all the elements nicely balanced and arranged: two stands of silhouetted trees on a ridgeline, with an offshore rock placed perfectly in the gap between the trees, and another rock spaced neatly out to the left. There was even a scalloped line of waves in the foreground to lead the eye toward that gap and the distant rock.
It’s all too rare to find a near-perfect arrangement like this. Even when something catches your eye right away, it usually takes at least a little bit of work to find the best way to frame it. But even when you find a ready-made composition, you still need the right light to make it work, and you still have to execute the photograph.
When we found this scene, we were looking right into the late-afternoon sun. My first thought was to wait until the sun set, which would reduce the contrast, make the exposure easier, add some color, and avoid problems with lens flare. But as I stood there, I was drawn to the light at that moment. The sun itself was nicely positioned, balanced between the two offshore rocks. The distant fog bank silhouetted the pyramid-shaped rock perfectly. There was a beautiful, late-day mood to the scene. So I decided to try it.
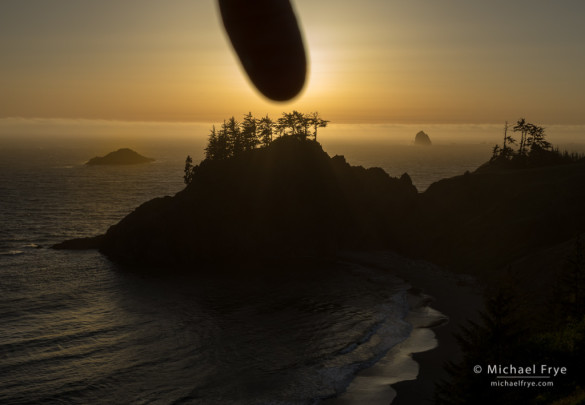
To deal with the contrast, I set the camera to auto-bracket three frames, each two stops apart, in case I needed to blend exposures together later. For the lens flare, I used a trick that a workshop student once taught me: using my thumb to block the sun. Basically it worked like this: I bracketed three photographs normally, then stuck my thumb into the top part of the frame, just far enough to cover the sun, and bracketed three more photographs. This gave me six images: three bracketed exposures with my thumb in the frame, but no flare, and three bracketed exposures with no thumb, but spots of flare in the bottom half.
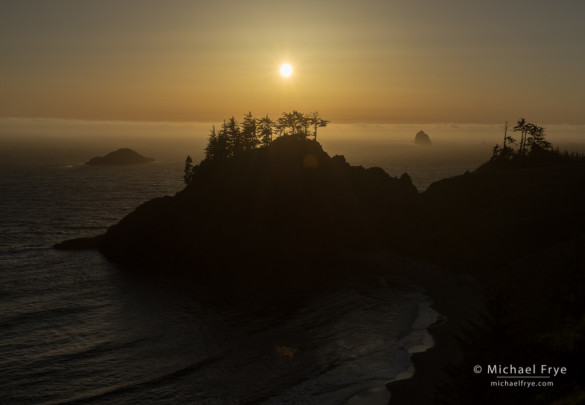
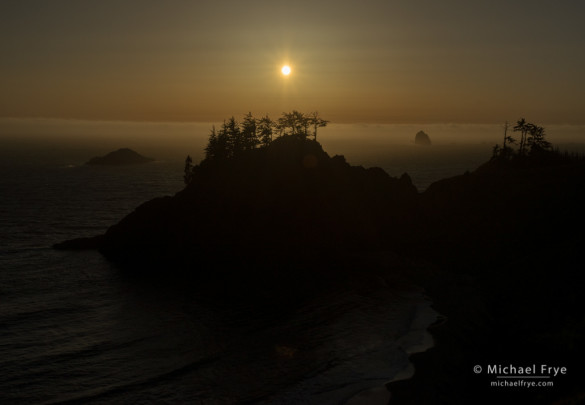
Then I stacked three of those frames together as layers in Photoshop, and used layer masks to blend the layers together and create the finished image you see at the top of this post. The bottom two-thirds of that final image is all one frame: the lightest of the three images with my thumb in it. Since my thumb covered the sun, there’s no flare, and you don’t see the thumb in the finished image because I didn’t use the top part of that frame. The sky in the final image comes mostly from the middle exposure without my thumb. I also used the darkest of the thumb-free images to blend in a little more detail around the sun itself. To help you better understand this whole idea, I’ve included the three original images here:

The bottom two-thirds of the final image comes from this frame, with my thumb over the sun to prevent flare.

Most of the sky in the final image comes from this frame. (Note the spot of flare just below the trees, and another spot in the water near the bottom.)
All this manipulation was done to achieve a final result that I hope looks natural and unmanipulated. To me the finished image closely resembles how the scene actually looked to my naked eye – with no lens flare (our eyes don’t create flare), and with about the same amount of detail in highlights and shadows.
I stayed at this spot until well after sunset, and made many other images, but ended up liking this first one, with the sun right in the frame, the best. So I guess one moral of this story is to trust your instincts. My instincts told me not to wait, despite the difficulty of photographing directly into the sun. I’m glad I listened.
On the other hand, most situations aren’t like this. Many times the best composition is not immediately obvious, and your second or third idea might work better than your first. And late in the day the light usually gets better as the sun gets lower. So if you find a great scene with good light, work it, and keep working it until the light is gone. That’s what I did here, and even though I ended up liking my first attempt the best, that’s the exception, not the rule.
— Michael Frye
Related Posts: Courting Luck, Part 2: Adapting Your Composition to the Conditions; When Separation is a Good Thing
Did you like this article? Click here to subscribe to this blog and get every new post delivered right to your inbox!
Michael Frye is a professional photographer specializing in landscapes and nature. He is the author or principal photographer of The Photographer’s Guide to Yosemite, Yosemite Meditations, Yosemite Meditations for Women, and Digital Landscape Photography: In the Footsteps of Ansel Adams and the Great Masters. He has also written three eBooks: Light & Land: Landscapes in the Digital Darkroom, Exposure for Outdoor Photography, and Landscapes in Lightroom 5: The Essential Step-by-Step Guide. Michael written numerous magazine articles on the art and technique of photography, and his images have been published in over thirty countries around the world. Michael has lived either in or near Yosemite National Park since 1983, currently residing just outside the park in Mariposa, California.


Michael, that’s a beautiful shot and an interesting technique to render it. I’ll have to try that (when I have gear again). I’ve usually just combined content-aware, healing brush, dodge/burn, and clone tools for sun spots. And I’ve wondered about the pros who leave it in as part of the shot (stills & in movies), making me think about what it adds to the feel, when it’s “OK” to leave them in, etc. I guess it all comes down to personal preference & artistic interpretation.
Thanks Monika. Of course I’ve cloned out lens flare too, but this technique can actually be easier. Plus, as you might notice in the original photos shown above, flare isn’t just spots, it also manifests as an overall washed-out look – a lack of contrast. You can see that in the bottom portion of the two photos without the thumb compared to the one with the thumb. That washed-out look can be dealt with too by adding contrast and clarity, but again that’s more work. Leaving in flare can work too, but it depends on the flare, and what you’re trying to accomplish. In this case the flare isn’t very interesting – a washed-out look, and a couple of random spots. The right kind of flare can suggest bright sun, but the wrong kind of flare is just distracting, and it’s often hard to see it in the field and know what you’re getting. In this case, as I said, I was looking to create a finished image that looked like the scene I saw in front of me, and meant not having lens flare.
My Nikon manual scares me away from shooting into the sun. Can you do an article about how you determine what conditions or sun position won’t set fire to your shutter curtain or make you see spots for hours later?
Bill, I’ve taken thousands of photos into the sun and never experienced a problem. I suppose if you left the camera pointed toward the sun with the shutter open (i.e., in live view) for a long time you might damage something, but although I’ve heard people say that could happen, I’ve never actually seen a case of that. If you’re not in live view the light is getting bounced off the mirror, up through the prism, and through the viewfinder. Yes, you have to be careful about not staring into the sun and damaging your eyes. Luckily it hurts to do that, so we have a natural defense mechanism. This is where actually using live view helps, since you can compose and photograph without actually looking at the sun itself, only the rendition of it on the screen. My Sony is always in live view, and again, I haven’t experienced any problems shooting into the sun.
Interesting technique. I wish I had read this before I was over there on the memorial day weekend. I saw some of the best sunsets from this spot but I don;t think I got any pictures that would do much justice.
Thanks Milind – it is a helpful technique sometimes.
Very nice Michael. Did you take with your Sony? If so did you really need two captures, it looks like it could have been done with one with the great range of the Sony.
Thanks for all your wonderful tips and information.
Bob
Thanks Bob. Yes, I did use the Sony, and yes, I did really need two (actually three) captures, as the contrast was extreme – even aside from the lens flare issue. One lighter capture would have lost detail around the edges of the sun, while bringing out shadow detail in a darker exposure creates too much noise – even for the Sony.
I appreciate your answer and the reassurance. Obviously, I wouldn’t shoot at the sun at high noon, but I was nervous about trying something earlier than a late sunset, and I have, until now, been reluctant to try those terrific through the trees shots of sunrays, thinking I might move into too exposed a position, so thanks again for the helpful assurance in relieving of my yipps.
You’re welcome Bill. 🙂
Hi Michael,
The mood in that scene is great. And how wonderful that the composition was just waiting for you to photograph it! I like that thumb trick to reduce lens flare. I am going to have to remember it. Thanks (and thanks to your student) for sharing.
Thanks Vivienne! I appreciate all your comments here.
I love this image. I had the distinct honor of taking a private workshop with Michael (thanks to a gift from my wife) not long after this image was taken. Michael shared this image with me as a example for all of about 15 seconds during our post processing discussion. I vividly recalled every element of this image for several days afterward and was extremely pleased to see it in this blog so that I could share it with my wife. To say that this image composed itself is extremely modest. It is an amazing scene that was expertly composed by an amazing artist!
Jim, thanks very much for all the kind words – I really appreciate that. I enjoyed meeting you and spending time with you during the workshop!
Hi Michael,
I hadn’t heard about that technique, but it would have come in very handy. I’ll definitely give it a try. I was in the same area of Oregon last year and took a similar photograph, but I think I prefer the leading lines of your composition. I’ll have to go back to the original images and considers the other possibilities. This was my composition:
http://www.robdarbyphotography.com/img/s3/v44/p865775165-5.jpg
So when are you going to offer an Oregon workshop?!! Thanks for sharing.
Rob
Rob, thanks for sharing your photo. I think your image works very well, which shows that there are a variety of ways to compose that scene. The thumb technique would have prevented the small spot of flare near the bottom, and bracketing and blending exposures would have allowed you to get more detail around the sun, but those are minor issues that don’t really detract from the overall feeling of the photograph. Nicely done!
Very informative article Michael. Having lived in Gold Beach (30 miles north of Brookings) I spent years exploring and photographing the area you were in, Samuel Boardman Sate Park. You’ll have to return and give it another try. I feel it’s some of the most spectacular scenery on the West Coast.
Richard
Thanks Richard. I’d like to explore Samuel Boardman park more – it’s a great area.
Thanks for a terrific article. I’ve often wondered how to shoot straight into the sun and avoid flare, and it has always been a hit-or-miss result for me. This tip is terrifically helpful! Love your photography!
Thanks Richard – glad you found this helpful.